Tuyeres are the tubes that bring the air from the bellows to the furnace. They can be made of wood, ceramic, PVC pipes, copper pipes, old vacuum cleaner tubes, really whatever you can come up with that will do the job. They are usually connected to the bellows, but in some cases they can just be set close enough that the air is delivered through them to the furnace. If you have a set of two bellows, the tuyeres are in a “Y” shape, with two ends connected to the bellows that connect to a single end going to the furnace.
Archaeologically there aren’t many remains of tuyeres. There are some fragments of tubular ceramic objects that had evidence of burning on the end. However, the best example is a wooden one recovered from a Danish bog. This was the same sort of “Y” shaped one described below.
Quick and easy: Tuyere #1
One of the problems of working with kids is that they are so fascinated with flames that they sometimes don’t realise that the bellows aren’t the part that supposed to be burning. So I’ve been working on making a couple of new sets of tuyeres.

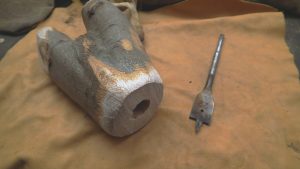
I’m under a deadline for one set, so this will be a quick and easy version. I pulled a good sized forked branch from the woodpile and cut the ends so they were fairly even. Then I got a 22 mm spade bit (in Britian it’s known as a flat bit). Then I just clamped it into a vise and drilled into the flat ends of the wood until the holes met near the centre. I removed the bark, rounded off and sanded the ends. I don’t want any bark that will work loose over time, or any sharp edges that will abrade the inside of the leather on the bellows.
I usually like one with a wider fork, but this will do in a pinch. It’s more important that the two ends are close to the same angle from the main trunk to minimise any kinks when connecting them to the bellows. The tuyere will be connected by leather tubes to the bellows and held in place by strips of rawhide. Skip down to the section on putting them all together for the details on that.
Note: Save that sawdust that you’re generating with all that drilling. It will come in handy for making moulds!
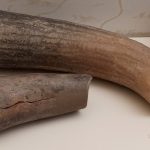
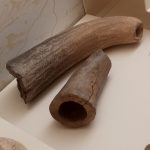
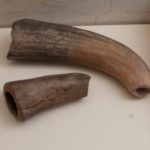
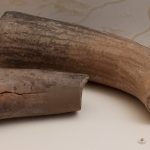
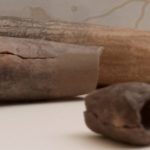
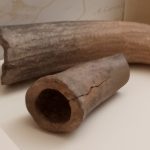
Larger and more labour intensive: Tuyere #2
The next one is another wooden tuyere for a new set of bellows I’m making. It’s larger, so the spade bit isn’t an option. Instead I cut the wood in half lengthwise and then carved out the inside with woodworking gouges. It’s all handwork, so it takes longer, but one advantage is that the diameter of the air holes isn’t limited to the size and length of the drill bit.
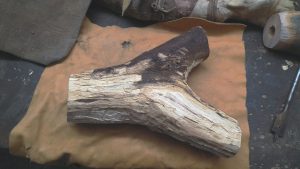
Once the branch was cut, I marked off where I would carve out the centre and went at it with chisels and gouges. I made the interior as smooth and as even as possible. However, I don’t smooth the surfaces that will be glued together. They already fit well and the rougher texture will help the glue bond. If you’re going for authenticity, you can use birch tar or other natural glues. If you’re pressed for time Gorilla Glue works very well. Other tuyeres I’ve seen are held together with leather and rawhide.
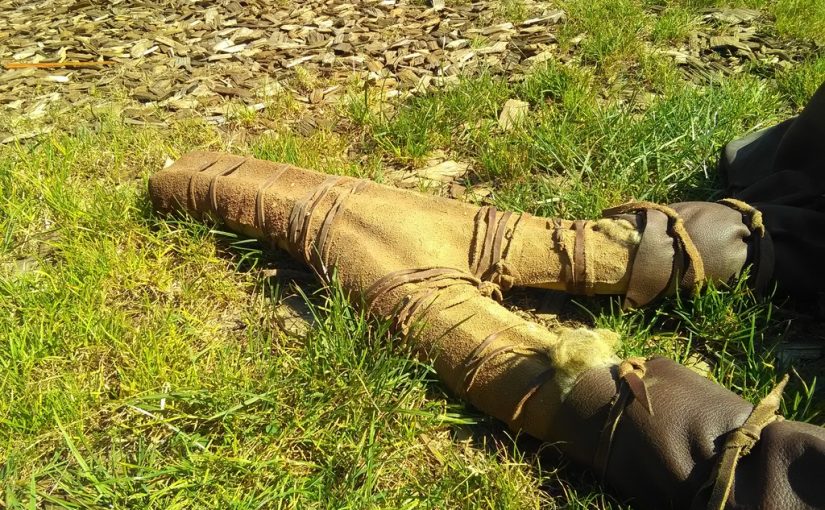
Another variation was made by Morgan Van Es, who hollowed out a “Y” shaped branch and then covered it tightly with leather. This is far easier than drilling holes or carving two pieces of wood and trying to fit them back together again. The tuyere definitely works!

Ceramic and other Tuyeres
If your tuyere might be placed close to the furnace (as mine accidentally was), it would be a good idea to make a ceramic extension. This is just a tube made of the same ceramic you used for making the furnace or moulds. It can be fit to the end of your wooden tuyere with leather and rawhide, as described below, and the end can go straight into the furnace. The only problem I find with ceramic tuyeres is the possibility of them breaking when being transported or if someone steps on them.
At the Terramare Village in Montale, the tuyeres they use there have a 90 degree bend. The tuyere sits on the edge of a small, shallow furnace and blows air straight down onto the crucible. It’s an Early Bronze Age design and does get hot enough to melt bronze and copper. If you don’t have much space for a furnace this would be an ideal solution. It’s also worth experimenting with different types of furnaces to get an idea of how many solutions there are to the basic question of how to melt and cast metal.
There are some beautiful ceramic tuyeres in the Musei di Palazzo Farnese in Piacenza. They are from the Terramare culture that spread through the Po Valley in northern Italy.
Click on the thumbnail to get the entire photo.
At the EAA in Glasgow, I saw a poster showing the reconstruction of a beautiful horse-headed ceramic tuyere by Katarina Botwid of Lund University. This is similar to the right-angled ones they use in Montale. You can see the tuyere in action here.
I’ve also made tuyeres using the stems of Japanese knotweed. The stems are hollow, similar to bamboo, but much softer. The plants can get over an inch in diameter and several feet tall. The stems can be easily cut with a knife, small garden shears, or secateurs, and then the membranes between sections can be broken by poking a straight stick through them.
Note: Japanese knotweed is a controlled invasive species in Britain. Any fragment of stem, leaf, or root will take root and start a new plant. They are almost impossible to get rid of once started. When I find a large stand of knotweed, I strip off any leaves and excess stems and leave them there. If I need to trim off any more once I’m home, I put it in a plastic bag and then put it in the bin.
As I said earlier, tuyeres can be made of anything that will get the job done. If you don’t need to have that “authentic” Bronze Age look, you can quickly whip something together with PVC plumbing or copper piping. It wouldn’t be glamorous, but as long as any flammable or melt-able parts are kept away from the heat of the furnace, it should get the job done.
Putting them all together
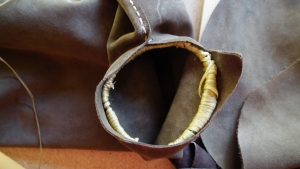
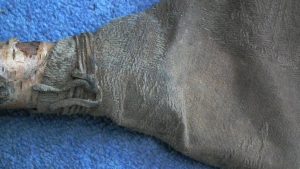
The tuyere still needs to be connected to the bellows. I usually make tubes of leather that fit the tubes coming out of the bellows and the ends of the tuyere.This allows for some flexibility and gives you a bit more distance from the furnace.

Then I tie them in place with wet rawhide. Once the rawhide is dry, they are about as secure as you can get. If the leather is soft, the tubes have a tendency to twist or collapse, so a nice solution is to get some green willow twigs and roll them into a spring. Fit them into the tubes before doing the final attachment and they’ll keep the leather tubes open and prevent them from twisting.
I also fit twisted willow hoops into the ends of the bellows to keep the leather from collapsing.
Everything is fit together and tied with damp rawhide. Once the rawhide is dry, the bellows are ready to go.
By the way, if you have a hard time finding rawhide lacing, buy a rawhide dog chew. Soak it in a bucket of water overnight and then cut it into long strips while it’s still damp. If you don’t need all of it right away, let it dry out. Then when you need it again just soak it for a few hours and it will be nice and flexible again.