Tag: Bronze Age
Vounous 2024
The annual Vounous Symposium is a 17 day long event where artists and archaeologists from around the world gather to collaborate and recreate the objects from Bronze Age Cyprus. During the symposium they will explore ancient techniques for making ceramics, metalworking, and other crafts.
This year I’ll be doing a video diary of the event.
Day 1: A walk-around of the site
Making a Bronze Age Gold Leaf Crown
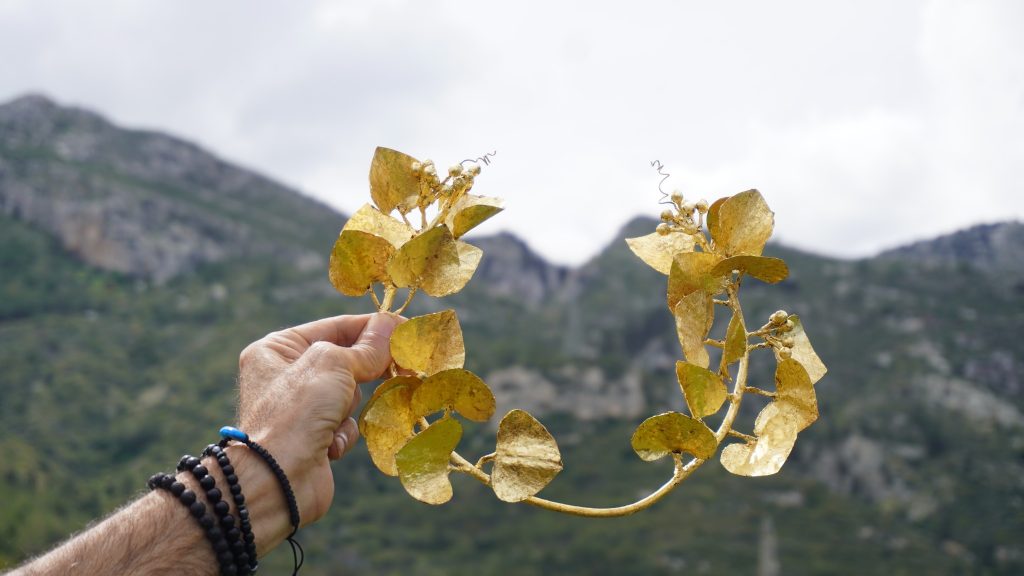
Photo by Rauf Ersenal
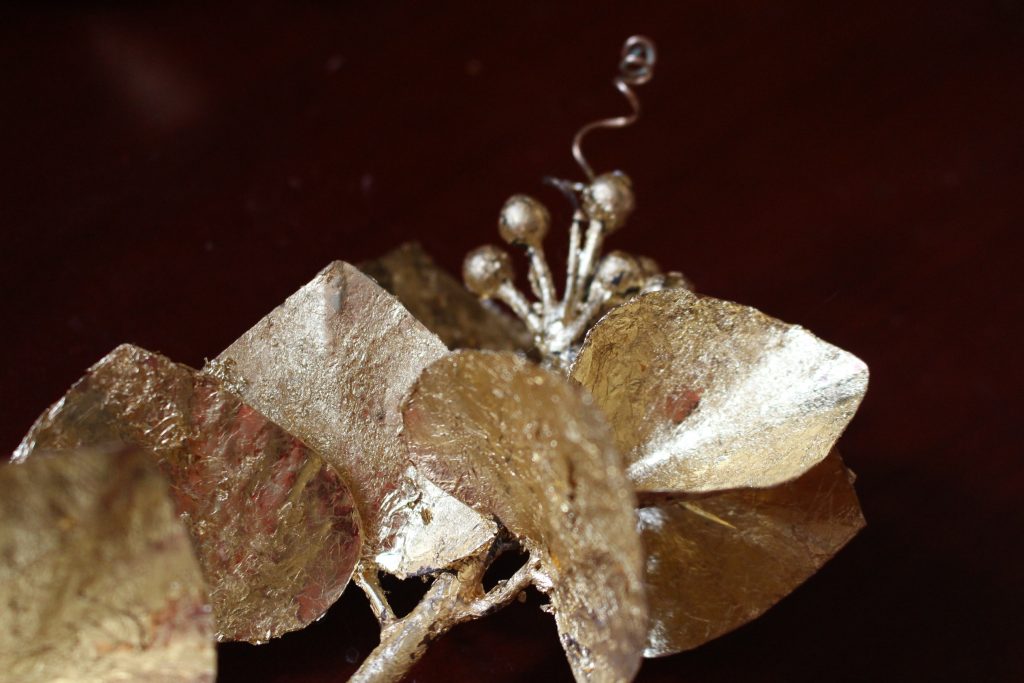
I wanted to recreate one of the gold leaf crowns found in Cyprus. These date back to the Bronze Age there and have been found in burials. The one I chose to replicate is in the Güzelyurt Museum of Archaeological and Natural History, Northern Cyprus. The crown has ivy leaves, berries, and two tendrils.
The original was made of gold, however unable to afford that much gold, I used copper and gold leaf. I also did not create the wire or sheet from scratch. I had planned to make the berries using a dapping block, but a bout of Covid meant that I lost a couple of weeks of time to work on it, so instead I bought 8 mm copper beads.
Making the structure of the crown
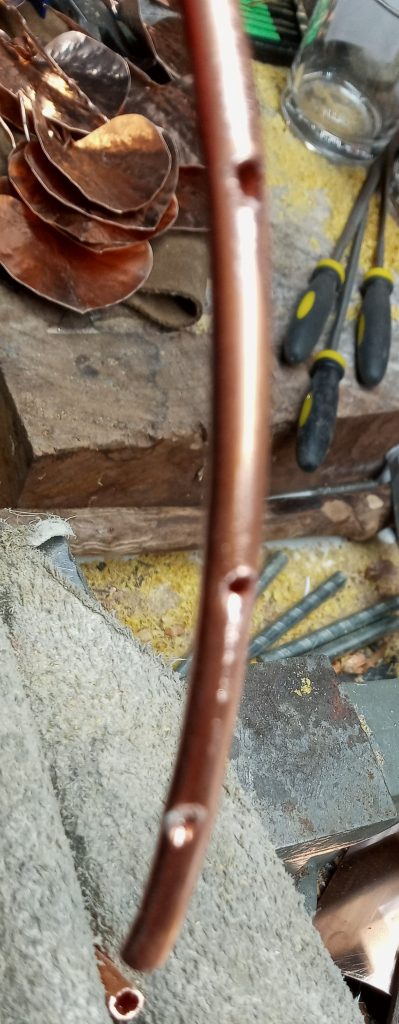
The base of the crown was made from Copper Tube (5/32″ ID × 3/16″ OD(4-5mm)) that is commonly used for refrigerators. The original was made from two pieces that were overlapped and held together by wrapping with wire in two places at the back. Since I intended this to be worn, I wanted the crown to be as sturdy as possible, so used one piece of tubing. The original and the replica are both open at the front.
The first step was to drill holes in the tubing. Twenty-four leaves are concentrated along the sides and front. The leaves are in twelve pairs along each side.

The leaves were cut from 30-gauge (0.31mm) copper sheet. The metal was thin enough to be cut with a strong pair of scissors. Long stems were cut out extending from the leaves. The leaves were chased to imitate veins using a bronze hammer with a chisel shaped face. The stems were twisted and then were inserted into the holes and soldered in place.
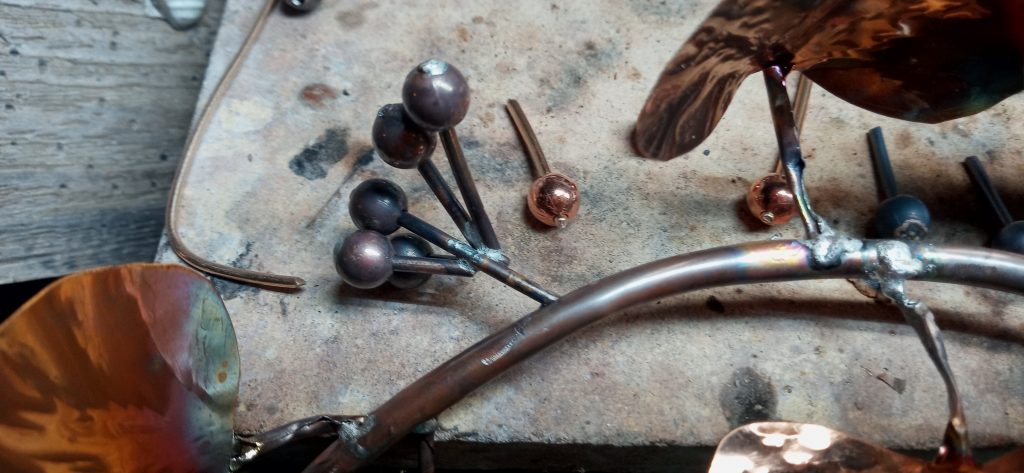
The berries were put on stems by inserting 12-gauge (2.6mm) bronze wire into the bead and soldering at the top. The stems were then soldered in bunches. Tendrils were made of 18-gauge (1.2mm) wire and soldered into two of the clusters that would be placed at the front of the crown. Four clusters of berries were soldered to the front of the crown by inserting into drilled holes and the ends of the tubing. Two more clusters were inserted into holes along the sides, facing outward.
The soldering was at times frustrating. I would get several in place, and then a leaf halfway around the crown would fall off. I ended up soldering one or two leaves and then leaving it for a half an hour to cool down completely before continuing to add leaves.
Applying the gold leaf
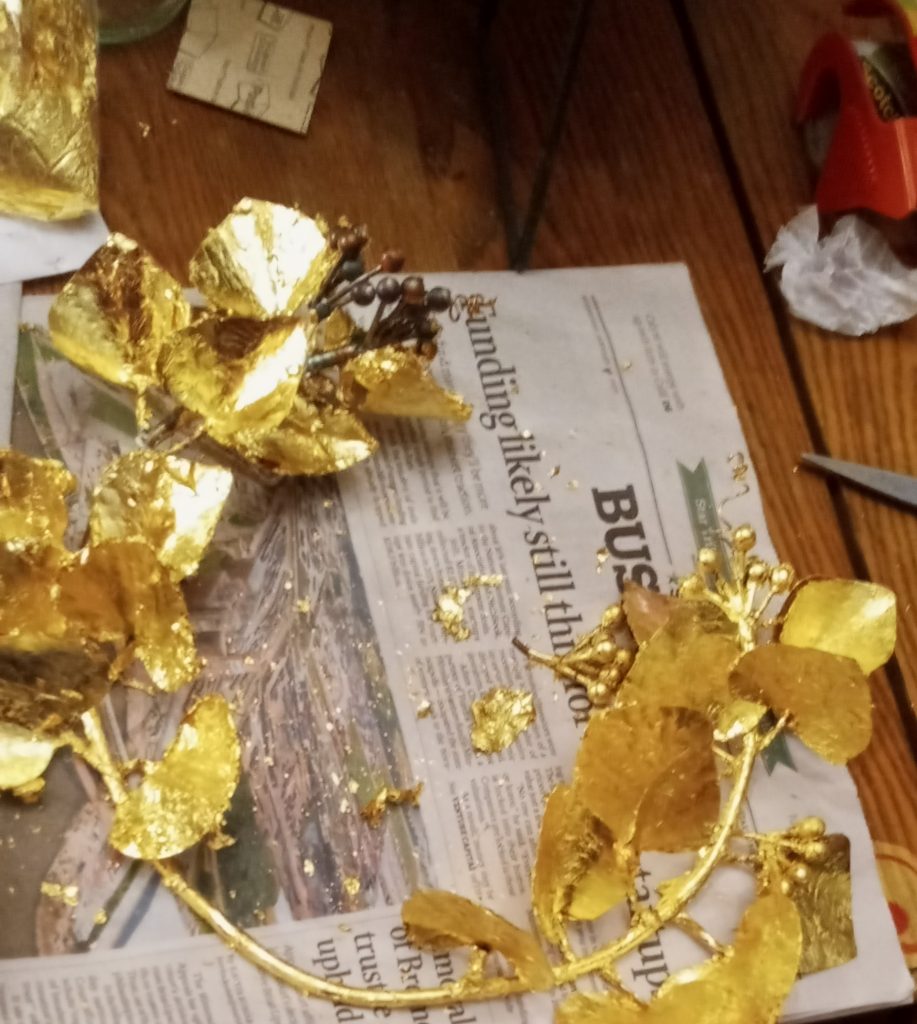
Leaves were coated with thinned PVA glue and gold leaf applied directly using fine sable brushes and tweezers. One was used for applying the glue, while the other was kept dry to to smooth the gold leaf. Multiple layers were applied, with each layer coated with the thinned PVA glue and allowing to dry. Despite the layers, the chased details were still evident.
Transport
The crown was to be packed into my carry-on bag for the flight to Italy and then Cyprus. For that I needed to make a sturdy box and interior supports. A box and lid were constructed of carboard and hot glue. Inside, supports were made of bubble wrap and closed cell foam. Supports were placed in the four corners and the centre, so that the crown would not shift during transport. The interior was lined with crumpled Tyvek®. Tyvek® creates a smooth snag free, inert surface that is ideal for contact with delicate metal surfaces. The interior structure was fixed in place using hot glue.
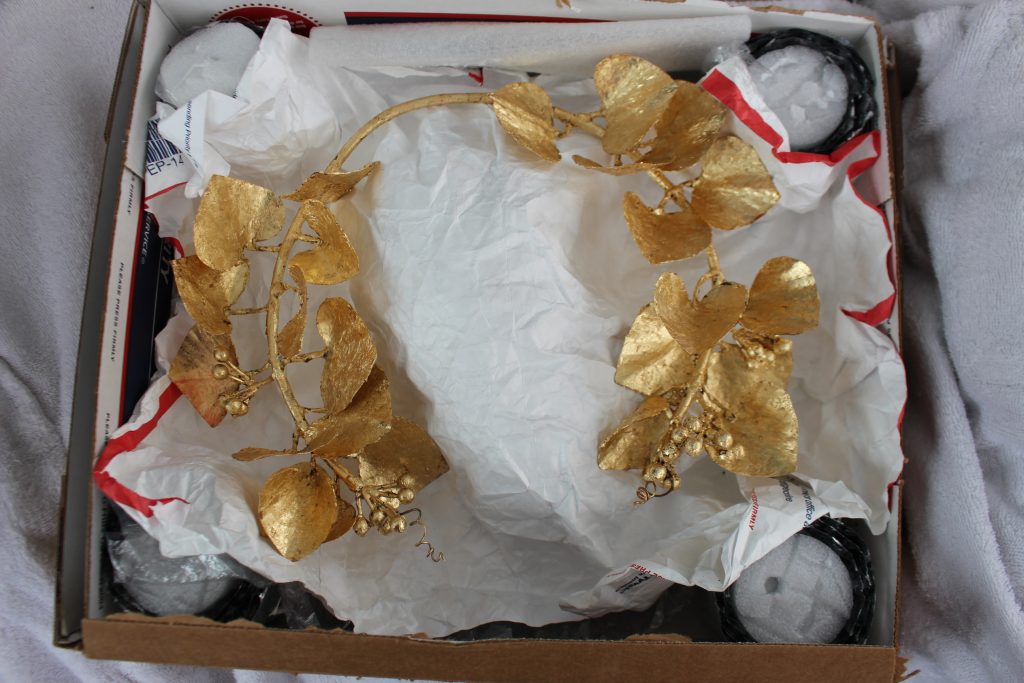
Despite my worries, airport security and customs did not notice the crown and it arrived safely. It was presented to Şenol Özdeverim, Rauf Ersenal, and Celal Dimililer during a meeting at the Çatalköy Belediye. The crown will be worn at the opening ceremonies of the 5th Annual Vounous Symposium in September 2023.
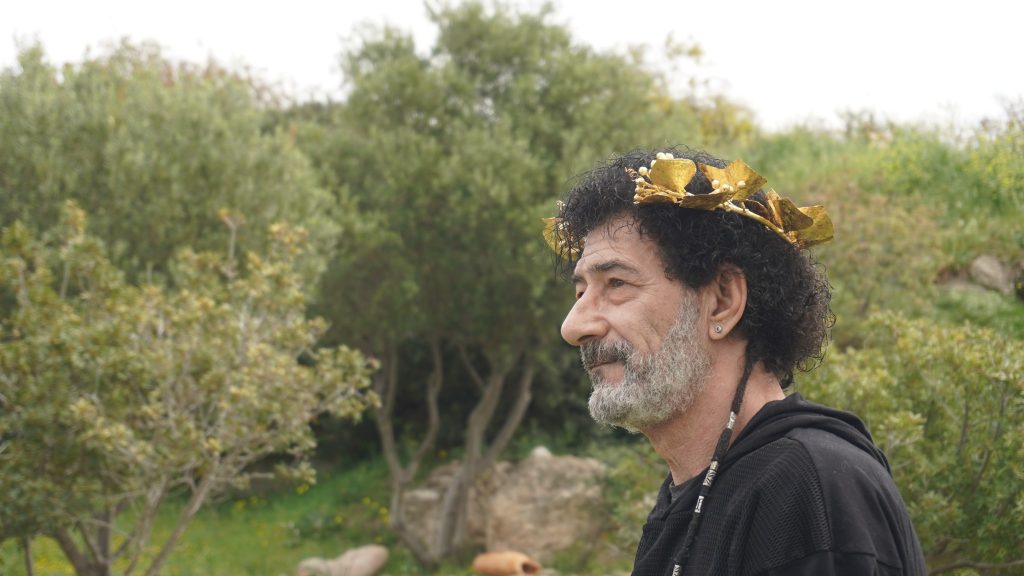
Photo by Rauf Ersenal
Making and Using Pot Bellows
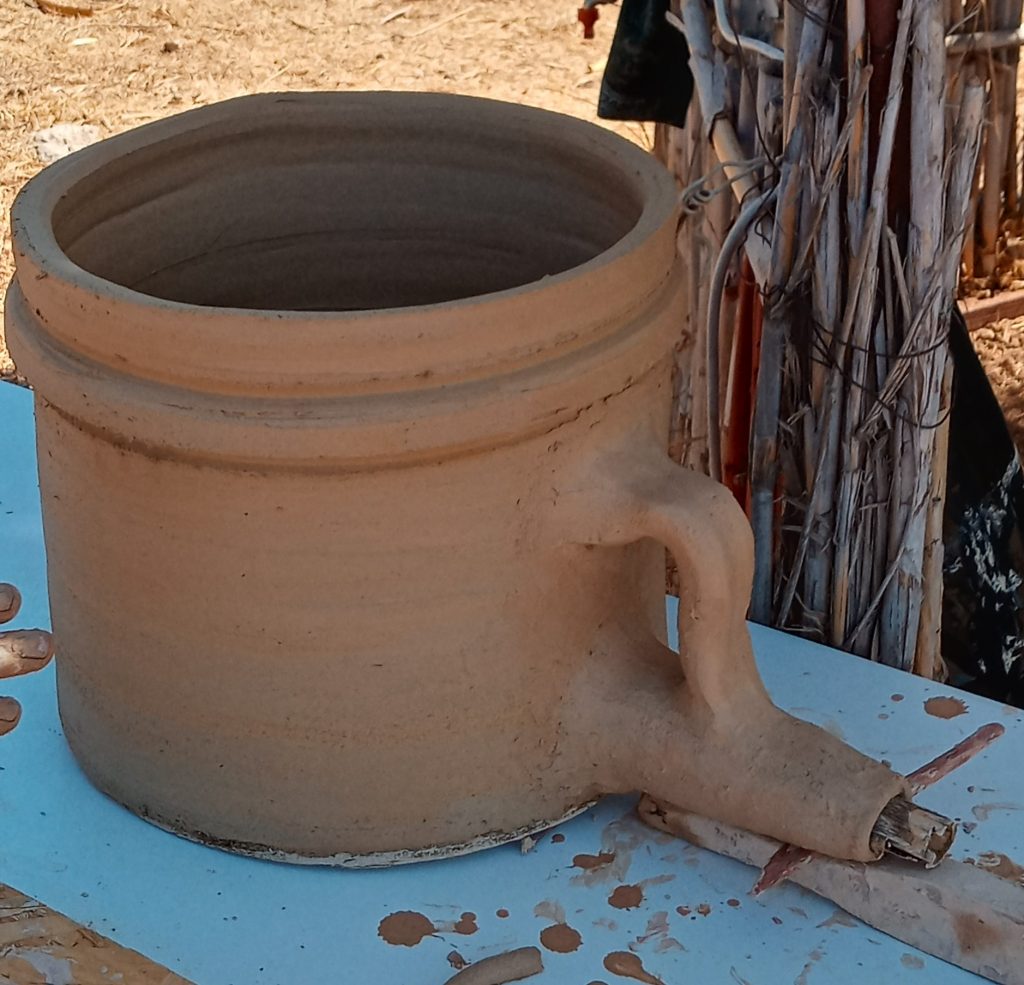
At the 4th Annual Vounous Symposium (2022) we wanted to make a set of pot bellows, based on ones that were excavated at Enkomi, an archaeological site in North Cyprus where metalworking was performed in the Bronze Age.
The process began by coil building and paddling şamot, a heavily grogged clay. As the bellows were formed a ridge was put near the top. This will help hold the leather tops in place, and prevent them from slipping off while they are being used. A tube was added and a hole cut in the bottom. The tuyeres, the pipes that connect the bellows to the furnace will fit inside these. The bellows were fitted with a handle. The handles aren’t strong enough to use for lifting the bellows, but later we found that they came in useful for adjusting the position of the bellows when we were getting ready to start work.
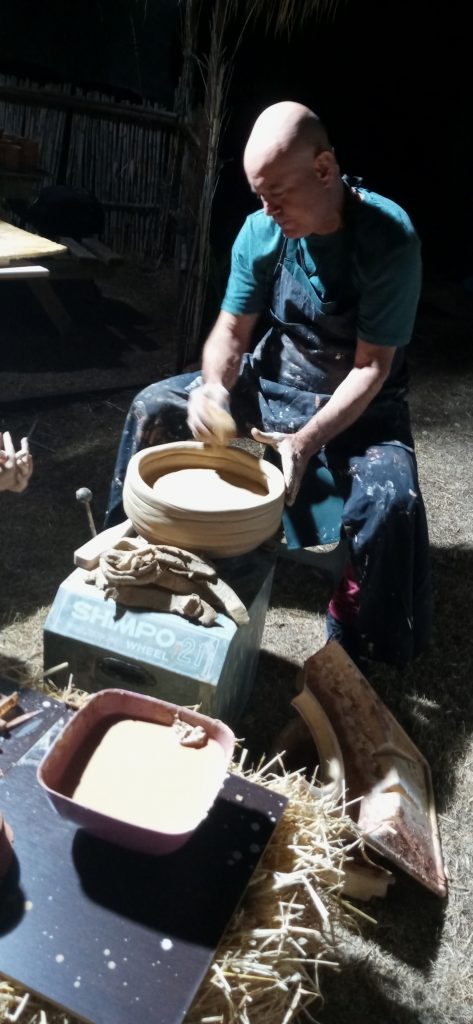
Coil building the base of the bellows
Adding the ridge
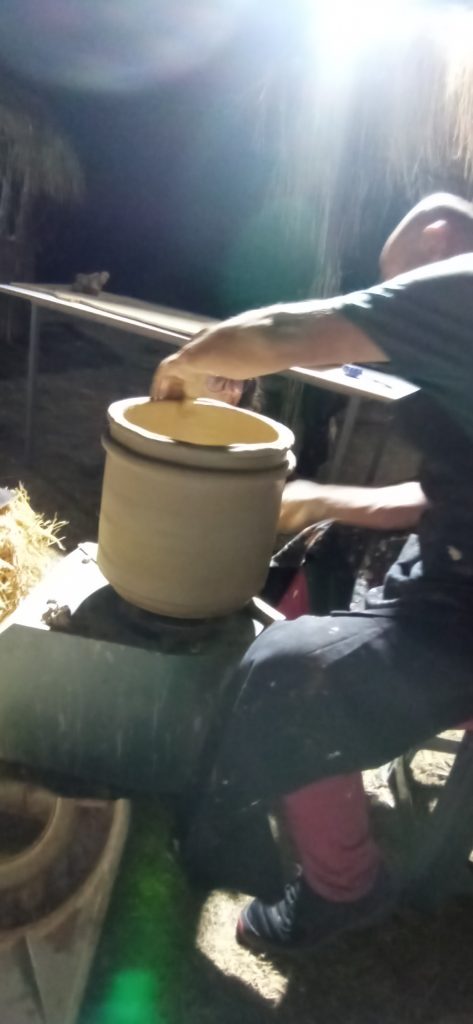
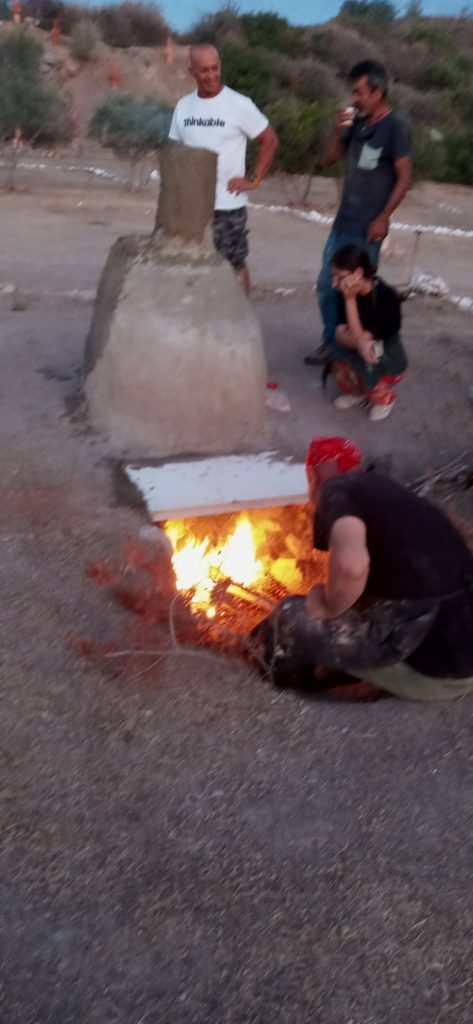
The bellows were too large for the kiln, so part of the side was torn out in order to fit them in. The wall was replaced and the kiln was filled with smaller pieces of ceramics. We had a nervous evening because we were uncertain whether the bellows would survive the firing. The walls were heavy and thick and we hoped that they had dried sufficiently to prevent cracking. The kiln was a primitive two chamber type, typical of the Bronze Age in Cyprus. The ceramics are loaded into the top, which has a perforated floor. A fire is built in a pit outside of the lower chamber of the kiln. The chimney (which was extended upwards for this firing) creates an updraft, pulling the heat through the furnace. Normally the fuel would be put in the chamber underneath the kiln, but there was concern that the concentration of heat would crack the bases of the bellows since the heat would be unevenly distributed, concentrating on the bottom of the bellows. This unevenness of the heat would cause the firing to be uneven and result in the bellows cracking.
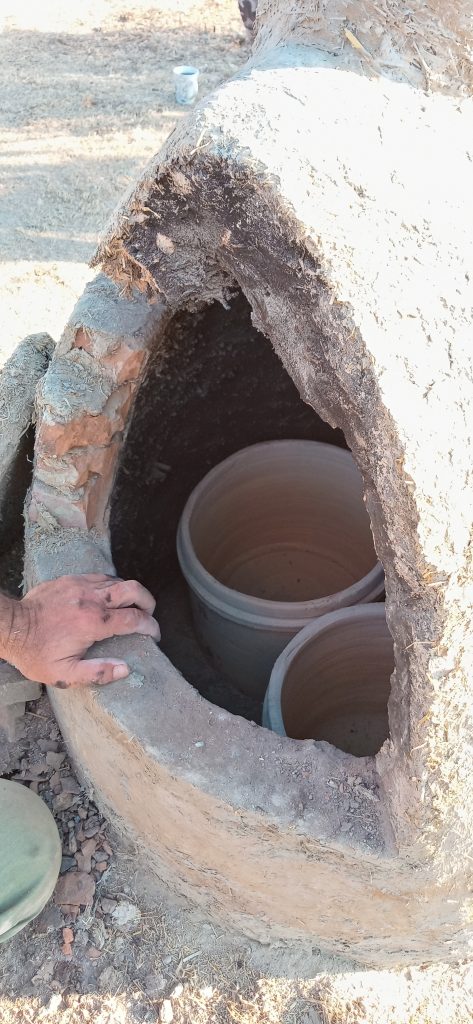
In the furnace
Firing the furnace
The next day they emerged perfectly fired. As soon as they were cool enough we put on the leather. The goat skins we bought were not large enough, so we used some soft cowhides. The hides are wrapped around the top of the bellows, with the edges overlapped by about 12 cm. When pulling up the overlap opens up and allows air in and then it closes on the downstroke. The result is a continuous and steady airflow. Thanks to Ergün Arda for his skills and expertise in making the pot bellows.

Ever wanted to know about ancient beer and brewing?
There’s a new podcast by The Prehistory Guys featuring my friend and fellow EXARC member Merryn Dineley, an archaeologist who specialises in ancient brewing and especially the process of malting. I’ve had some of the brews she’s made and will say that the ancient recipes produce some fine beer.
There’s a lot of useful information here for both brewers and archaeologists. She takes down some of the misconceptions about the old beer/bread debate, and tells us how not knowing the brewing process has led to some misidentification of archaeological features.
So open up a favourite beer, relax, and enjoy it while learning about its long and fascinating history!
Stories from Times and Epochs, Moscow
I have a Patreon page where I post stories about my travels and experiences casting bronze around the world. Last year I was in Moscow for the Times and Epochs festival, casting bronze with local reenactors. I learned a lot, both about different ways to cast bronze, and also about Moscow and Russia. The story is being told in installments. The first two can be found here:
If you’re interested in reading more, there are both public posts and ones that are available to my Patreon subscribers. There are also other benefits for supporters, including copies of powerpoints and articles, or even postcards sent from wherever I travel. Check and out my Patreon page here and consider a small contribution to support my ongoing work in experimental archaeology.
Vounous Symposium 2019
The 3rd Vounous Symposium went wonderfully well. We experimented with creating faience, including making it from locally resourced materials, resulting in what was named Vounous Blue. This year we had three furnaces, my little pit furnace from last year, one that is self drafting and one short shaft furnace. The self drafting one was used for the faience and small projects. It didn’t get quite hot enough for some things we needed, but the design was a work in progress. The shaft furnace was supposed to be for smelting ore. We had a couple of nice samples, but when we went to collect more, we found that the site was under water. Local members of Vounous will go back when the water is down and will collect more. Meanwhile we used what we had to make the pigment for the faience and smelt in a crucible. Since we had so little, we saved it for the evening of the closing ceremonies. People were impressed with the bright blue flames.
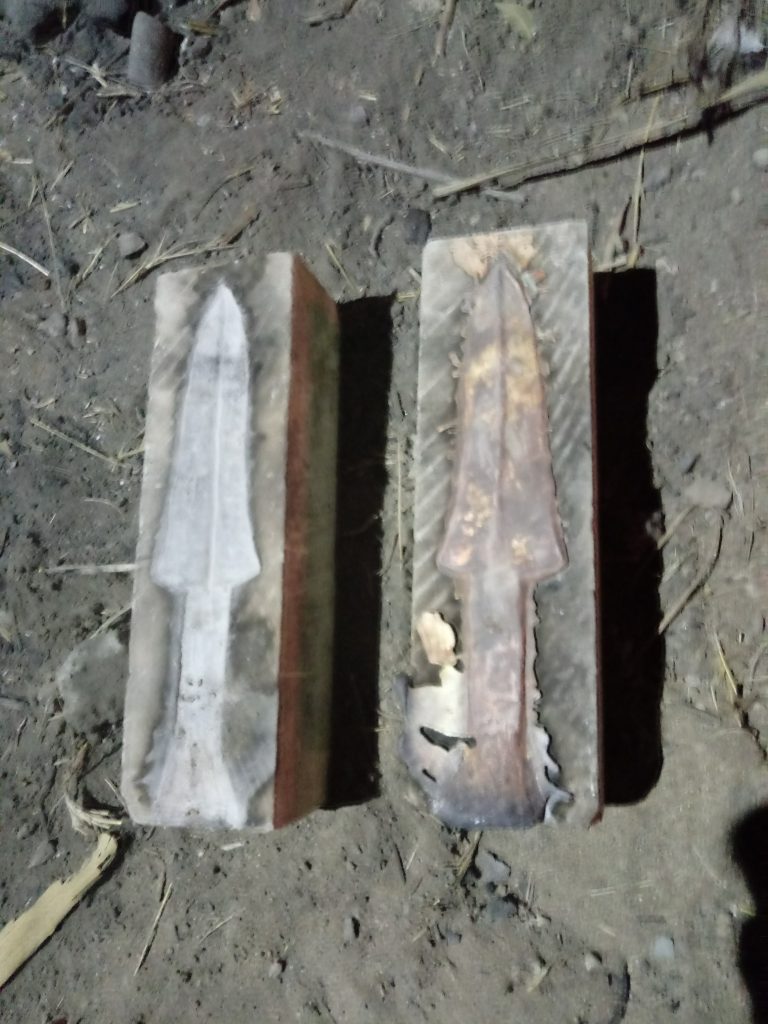
Chris, of Maunfactum Historicum carved limestone moulds for us to cast in, making replicas of knives and daggers that were excavated in the vicinity. He also carved an impressive Egyptian kopesh. We didn’t get that cast, but will try for next year. We wondered about the limestone because we’d always been told that it wouldn’t work. However the moulds we’d seen were local limestone, and we found that this worked very well. Apparently not all limestone is created equal.
The above photo is a replica of a dagger we saw at the Museum of Archaeology and Nature, Gurzelyurt ( Morphou) in its limestone mould. We’ve also cast daggers that are replicas of one that was found here at Vounous.
I wrote a short article for EXARC about last year’s Vounous Symposium. You can read it here.
Crafting in the World: Materiality in the Making

Crafting in the World is a new work that combines the world of archaeology, craft, and anthropology. It explores crafts in ancient and modern contexts and discuses the relevancy of understanding crafts to other disciplines.
I had the privilege of writing one of the chapters for this book. In it I discuss how metal objects can be read in a way that the actions of the smith can be visualised.
"This volume expands understandings of crafting practices, which in the past was the major relational interaction between the social agency of materials, technology, and people, in co-creating an emergent ever-changing world. The chapters discuss different ways that crafting in the present is useful in understanding crafting experiences and methods in the past, including experiments to reproduce ancient excavated objects, historical accounts of crafting methods and experiences, craft revivals, and teaching historical crafts at museums and schools.


Crafting in the World is unique in the diversity of its theoretical and multidisciplinary approaches to researching crafting, not just as a set of techniques for producing functional objects, but as social practices and technical choices embodying cultural ideas, knowledge, and multiple interwoven social networks. Crafting expresses and constitutes mental schemas, identities, ideologies, and cultures. The multiple meanings and significances of crafting are explored from a great variety of disciplinary perspectives, including anthropology, archaeology, sociology, education, psychology, women’s studies, and ethnic studies.

This book provides a deep temporal range and a global geographical scope, with case studies ranging from Europe, Africa, and Asia to the Americas and a global internet website for selling home crafted items."
The link to the publisher is here. It is an academic publisher, and so it is rather expensive. However some university libraries already have copies, so I would recommend seeing if your local library can get a copy, or borrow it on Inter-Library Loan. If all else fails, contact me through the website or Academia.edu for a PDF.
Making Felt Mittens for Bronze Casting

One of the invisible tools of the Bronze Age metalworker is protective gloves. It’s difficult to work with hot metal without some sort of protective hand gear. Even when using wooden tongs, it’s difficult to keep your hands away from the heat of the furnace. Handling heated stone or clay moulds is also difficult without gloves.
The most popular hand protection is to use commercial welding gloves. They do a good job and are fairly inexpensive. On the other hand when working with students, I have to regard them as being disposable. Someone will inevitably burn the leather, making the fingers stiff and difficult or impossible to work with.
When I was in Moscow for the Times and Epochs Festival, the bronze casters there had a nice alternative: felted wool mittens. They look like something that would have been used in the Bronze Age, do a great job of protecting hands from heat, and are repairable. When I got back to the US I wanted to make myself a pair.
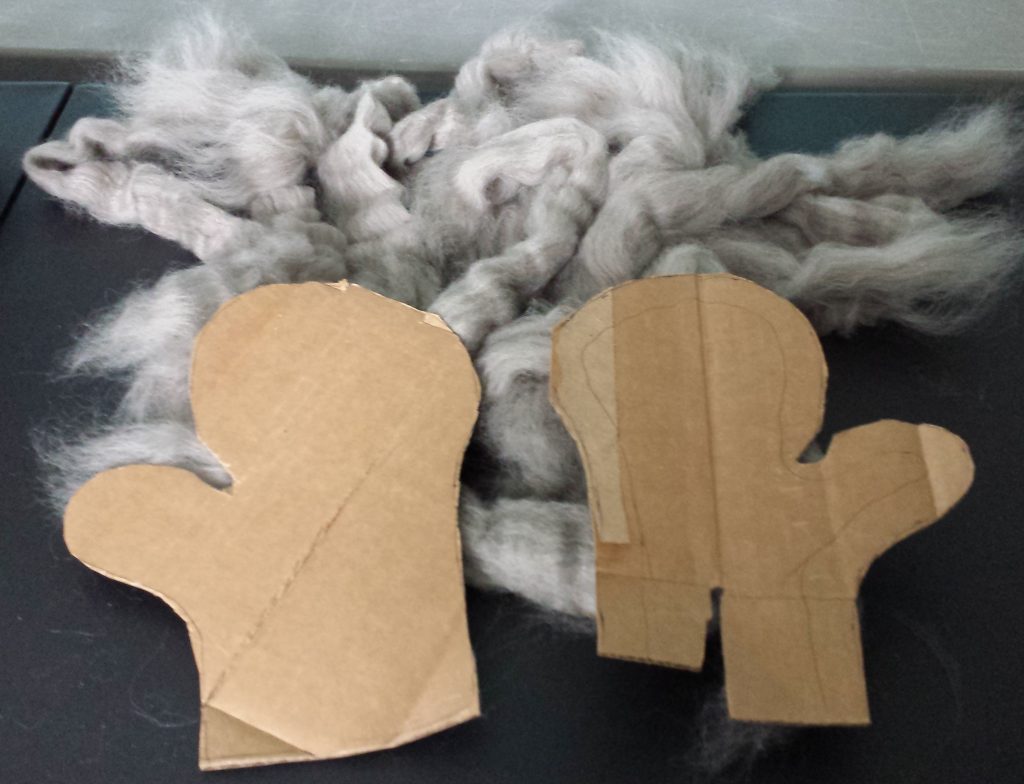
Making the mittens is a fairly straightforward process. Make a pattern out of some heavy cardboard by tracing your hand and adding a couple centimeters all the way around (the wool will shrink). You will need some wool. I bought some roving, wool that’s been cleaned and made ready for spinning, but you could even use wool straight from the sheep. Just make sure that the wool you use is not labeled as ‘superwash’. Superwash wool has been processed to prevent shrinkage. Great if you’re knitting socks, but useless for felting. I have small hands (another advantage, you can make these to fit!) so I used about 170 grams of wool. The only other supplies needed are hot water and a bar of soap. This is a messy process and takes awhile. You’ll need a clean work table in an area where you don’t have to worry about getting the table and the floor wet. Not to mention yourself. My thanks to the staff at StevenBe who let me use their felting room for the process
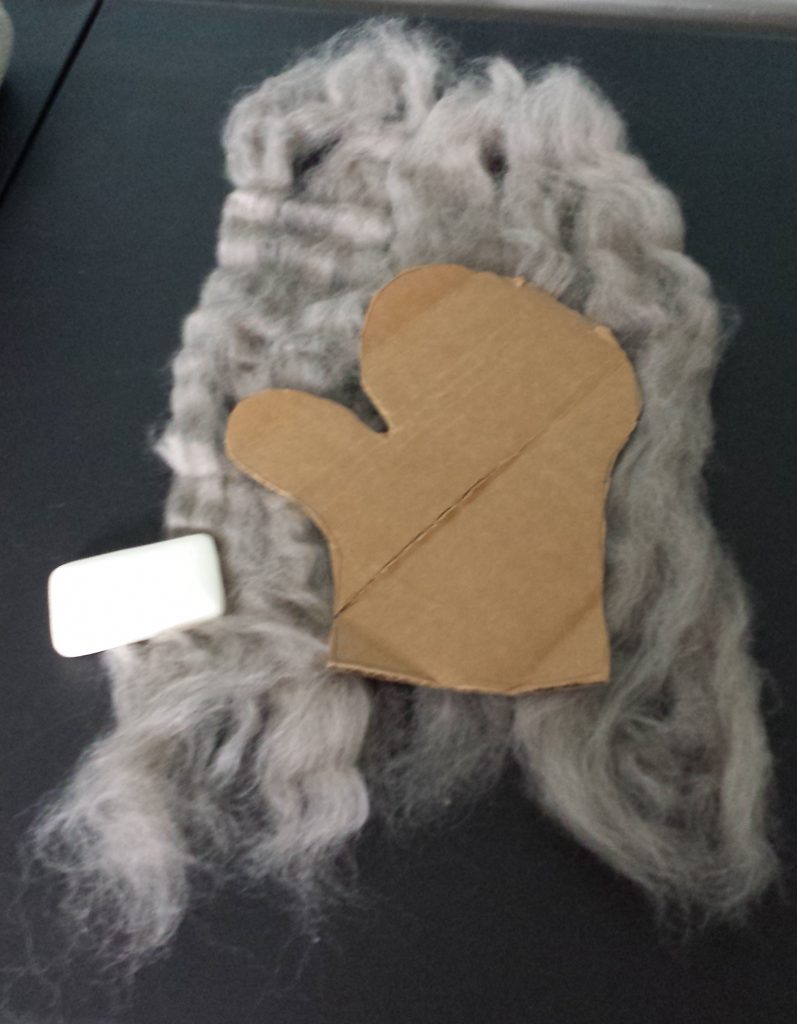
Lay out the wool so there’s enough to fold over the edges and top. Make sure that the bottom stays open. Take off the pattern for the moment and wet the wool with hot water and scrub it with the soap. Get the soap all through the wool. This is going to be messy. Put the pattern back and fold the wool so it is completely covered, except for where your hand goes in. Now, pushing down on the wool scrub it around on the work table, keeping it wet and rubbing in the soap, flipping it over and doing the other side.
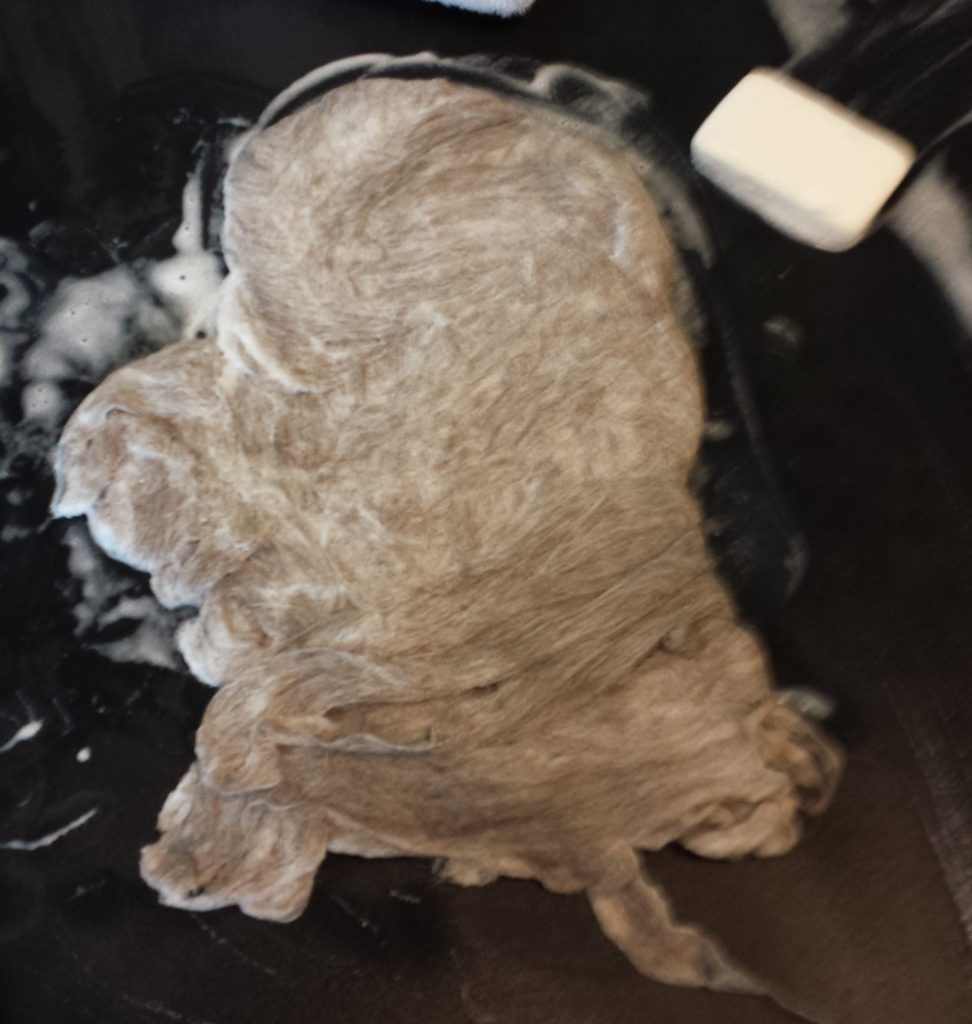
When the first layer is completely wet and starting to hold together, add more wool wrapping it 90 degrees from the first layer. If the first layer was from the top to the bottom, the next layer should be side to side. Keep soaping it up, adding hot water and scrubbing it around. At some point the cardboard is going to start disintegrating, so put your hand in there and scrub from the inside. By now you’re losing the will to live, but keep going.
Felting works because wool has scales, almost like tiny hooks. The action of heat and agitation causes these scales to get tangled and bind to each other. This is why wool sweaters shrink when they get put into a hot washing machine or a dryer.
Keep adding layers to the wool until it gets almost as thick as you want it. The wool will compress and get a little thicker when it dries. Once it’s the size and thickness you want, rinse out the soap and let it dry. Drying takes a long time depending on the weather. You can put it in a dryer, but be careful that it doesn’t shrink. A dryer can reduce the size considerably and compress the wool to the point of being dense. If the mitten shrinks too much you can wet it down again and stretch it out some more. You can also put something inside the mitten to keep it from getting too small.
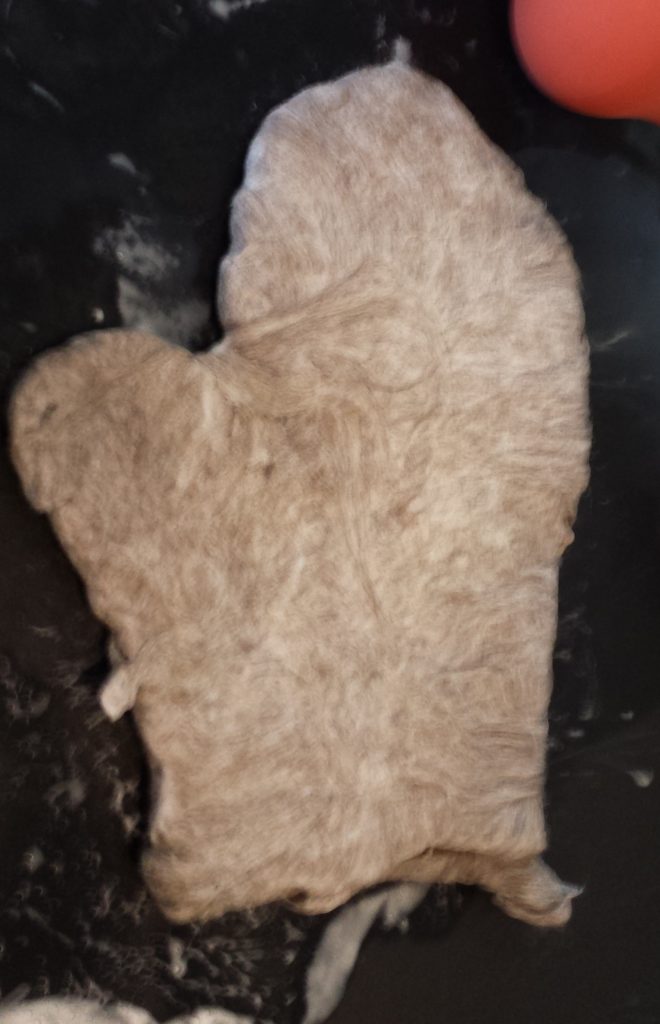
Once it’s done, you can twist it or pound it to get it a little more flexible. There’s nothing to say that you can’t also decorate it

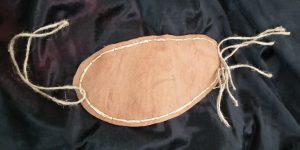
Bronze Age Shoes
I was invited to cast bronze at an event in Germany, but the catch was that I needed to dress in period costume. The skirt and tunic were easy enough, but I knew that the people there would look at my Iron Age shoes and comment on how anachronistic they were. I know, because it’s happened in the past. There are few Bronze Age shoes that have been preserved, and the most famous were the ones worn by Otzi, the Ice Man whose body was recovered in the Alps in 1991. There are a few websites describing how to make them, including one with a video,
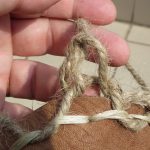
Following the instructions on this website, I cut out a pair of soles from the same leather I used for the Iron Age shoes, and punched holes around the perimeter. I didn’t have leather lacing, so I stitched them with multiple strands of sinew. Then I got some jute cord. This is made from the inner bark of the lime, or basswood tree (tillia sp). It is essentially the same as the cord used for Otzi’s shoes. I cut several lengths and started plaiting and knotting.
I quickly realised that it wasn’t going well. I couldn’t tie the knots while wearing the shoes, so I made a sort of shoe last out of socks. I just wasn’t enjoying the project and it was looking a mess. I just wasn’t getting the measurements right and the shoe was too large.
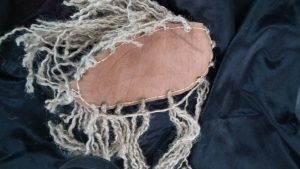
I just wasn’t producing what I wanted, so it went on the back burner. When it was about a month out from the event, I nagged myself into getting the shoes done. The problem was that I wasn’t happy with how they were turning out. It would be easier if I was making them for someone else, where I could tie the knots while they wore the shoes. It was then that I convinced myself that I didn’t need to slavishly copy this particular shoe. The materials were proper for period, I just needed to find a way to make them so I was happy while using a technique that would be consistent with the Bronze Age. I decided to make a netted upper rather than one that was plaited and knotted. I started over, this time using a single length of cord. I measured off a length that was 5 times the circumference of the sole (note, this finished about half the shoe. On the second one I measured 9 times the circumference and that worked out perfectly).
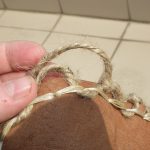
I wove the cord in and out of the sinew, skipping every other stitch and leaving a small loop at the top near the edge of the sole.
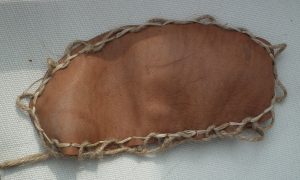
Then continuing around, I brought a loop through the loop next to the sole and then threaded the cord through that to make a knot. It was easily adjustable.
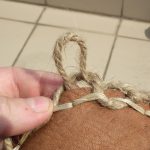
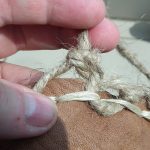
I made the first round fairly tight so that it would pull the sole up around my foot. I did the same for the second round.
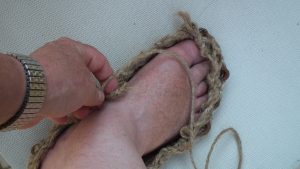
On the third round I made the loops larger because I wanted a netted effect. If I wanted, could continue making the loops smaller that would result in a denser fabric. At this point it was easy to work on the shoe while wearing it.
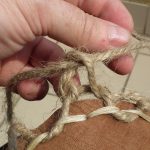
After a couple more rounds I started making the loops even larger. I brought the cord around the front of my ankle, looping the cord between it and the loops closer to my toes.
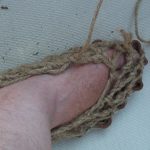
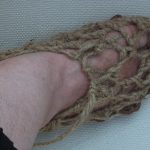
By this time I was essentially done. It took me about three hours for both shoes, working at a relaxed pace. I had a fair amount of cord left over, so I wound that around the top cord of the shoe to reinforce the opening and to give it a bit more of a finished look.

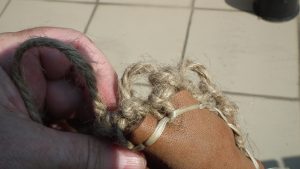
The finished shoes
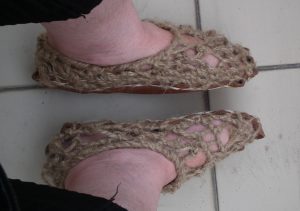
I made this pair fairly tight because I figure that both the leather and cord will stretch over time. Still, they are easy to slip on and off, and are comfortable for walking. I could make some leather uppers to go over the netting. Otzi’s shoes had that, although there is debate as to whether the leather was on top of, or under the cording. A project for the future is to learn nålebinding to make some socks.